WebP is an image format developed by Google in 2010 that provides superior lossless and lossy compression for images on the web. Using WebP, web developers can create smaller, richer images that improve site speed. A faster loading website is critical to the user experience and for the website's marketing effectiveness.
For optimal loading across all devices and users, images on your site should not be larger than 500 KB in file size.
WebP lossless images are often at least 25% smaller in size compared to PNGs. WebP lossy images are often anywhere from 25-34% smaller than comparable JPEG images at equivalent SSIM (structural similarity) quality index.
Lossless WebP supports transparency, as well. For cases when lossy RGB compression is acceptable, lossy WebP also supports transparency, typically providing three times smaller file sizes compared to PNG.
Google reports a 64% reduction in file size for images converted from animated GIFs to lossy WebP, and a 19% reduction when converted to lossless WebP.
The WebP file format is based on the RIFF (resource interchange file format) document format. The file signature is 52 49 46 46 (RIFF), as you can see with hexdump:
$ hexdump --canonical pixel.webp 00000000 52 49 46 46 26 00 00 00 [...] |RIFF&...WEBPVP8 |00000010 1a 00 00 00 30 01 00 9d [...] |....0....*......|00000020 0e 25 a4 00 03 70 00 fe [...] |.%...p...`....|0000002eThe standalone libwebp library serves as a reference implementation for the WebP specification and is available from Google's Git repository or as a tarball.
The WebP format is compatible with vast majority of the web browsers in use worldwide. At the time of this writing, it is not compatible with Apple's Safari browser. The workaround for this is to serve up a JPG/PNG alongside a WebP, and there are methods and Wordpress plugins to do that.
Why does this matter?Part of my job is to design and maintain our organization's website. Since the website is a marketing tool and site speed is a critical aspect of the user experience, I have been working to improve the speed, and reducing image sizes by converting them to WebP has been a good solution.
To test the speed of one of the pages, I turned to web.dev, which is powered by Lighthouse, released under the Apache 2.0 license, and can be found at https://github.com/GoogleChrome/lighthouse.
According to its official description, "Lighthouse is an open source, automated tool for improving the quality of web pages. You can run it against any web page鈥攑ublic or requiring authentication. It has audits for performance, accessibility, progressive web apps, SEO, and more. You can run Lighthouse in Chrome DevTools, from the command line, or as a Node module. You give Lighthouse a URL to audit, it runs a series of audits against the page, and then it generates a report on how well the page did. From there, use the failing audits as indicators on how to improve the page. Each audit has a reference doc explaining why the audit is important, as well as how to fix it."
Creating a smaller WebP imageOn one graphic I tested, the original web version was 650 KB in size. By converting it to WebP, I reduced the file size to 45 KB, and there was no discernible loss in quality.
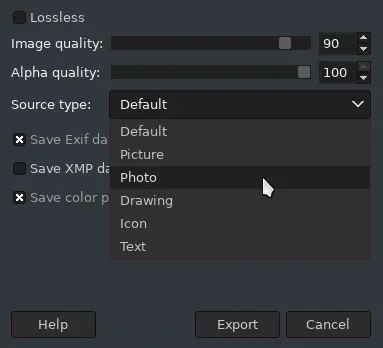
The open source image editor GIMP supports WebP as an export format. It offers several options for quality and compression profile:

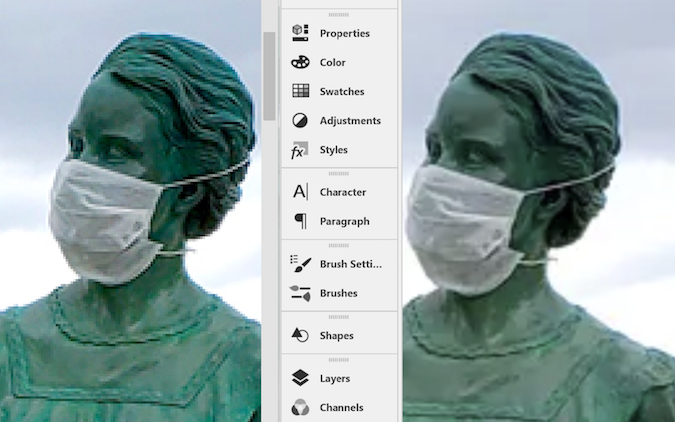
A zoomed-in look of another image:

PNG (left) and WebP (right), both converted from a JPG, shows the WebP, although smaller in size, is superior in visual quality.
Convert to an image to WebPTo convert images on Linux from JPG/PNG to WebP, you can also use the command-line:
Use cwebp on the command line to convert PNG or JPG image files to WebP format. You can convert a PNG image file to a WebP image with a quality range of 80 with the command:
$ cwebp -q 80 image.png -o image.webpAlternatively, you can also use Image Magick, which is probably available in your distribution's software repository. The subcommand for conversion is convert, and all that's needed is an input and output file:
$ convert pixel.png pixel.webpConvert an image to WebP with an editorMore Great Content
Free online course: RHEL technical overviewLearn Advanced Linux CommandsDownload Cheat SheetsFind an Open Source AlternativeRead Top Linux ContentCheck out open source resourcesTo convert images to WebP with a photo editor, use GIMP. From version 2.10 on, it supports WebP natively.
If you're a Photoshop user, you need a plugin to convert the files, as Photoshop does not include it natively. WebPShop 0.2.1, released under the Apache License 2.0 license, is a Photoshop module for opening and saving WebP images, including animations, and can be found at: https://github.com/webmproject/WebPShop.
To use the plugin, put the file found in the bin folder inside your Photoshop plugin directory:
Windows x64鈥擟:\Program Files\Adobe\Adobe Photoshop\Plug-ins\WebPShop.8bi
Mac鈥擜pplications/Adobe Photoshop/Plug-ins/WebPShop.plugin
WebP on WordpressMany websites are built using Wordpress (that's what I use). So, how does Wordpress handle uploading WebP images? At the time of this writing, it doesn't. But, there are, of course, plugins to enable it so you can serve up both WebP alongside PNG/JPG images (for the Apple crowd).
Or there are these instructions from Marius Hosting:
"How about directly uploading WebP images to Wordpress? This is easy. Just add some text line on your theme functions.php file. Wordpress does not natively support viewing and uploading WebP files, but I will explain to you how you can make it work in a few simple steps. Log in to your Wordpress admin area and go to Appearance/Theme Editor and find functions.php. Copy and paste the code below at the end of the file and save it.
//** *Enable upload for webp image files.*/function webp_upload_mimes($existing_mimes) {$existing_mimes['webp'] = 'image/webp';return $existing_mimes;}add_filter('mime_types', 'webp_upload_mimes');If you want to see the thumbnail image preview when you go to Media/Library, you have to add the code below in the same functions.php file. To find the functions.php file, go to Appearance/Theme Editor and find functions.php, then copy and paste the code below at the end of the file and save it."
//** * Enable preview / thumbnail for webp image files.*/function webp_is_displayable($result, $path) {if ($result === false) {$displayable_image_types = array( IMAGETYPE_WEBP );$info = @getimagesize( $path );if (empty($info)) {$result = false;} elseif (!in_array($info[2], $displayable_image_types)) {$result = false;} else {$result = true;}}return $result;}add_filter('file_is_displayable_image', 'webp_is_displayable', 10, 2);WebP and the futureWebP is a robust and optimized format. It looks better, it has better compression ratio, and it has all the features of most other common image formats. There's no need to wait鈥攕tart using it now.